Best Picture Hanging Tips I Have Found
The first few pictures I hung in my house, I used the help of my handy dandy talented contractor husband who, has all the right tools and does math easily in his head to hang pictures at the right height and can easily match the height or divide up the space perfectly. Having two kids, the project got interrupted, of course. But, there is something about moving, I don't feel quite settled until I see my artwork or families and friends faces on the walls surrounding me. It's how I mark my territory, or something. So, if you walked into my home, you would know my style, and immediately what I love. And, what I love, which as you will see in the next few pictures are my kids! My husband did complain that we need either different people on our walls and or more artwork. I agree, we spent a pretty penny on getting professional pictures taken of our kids as infants and that time was really the last time I updated what was in my frames. I told him, we will get the frames up on the wall with what we have in them now and then we will update them.
I set out the frames to put on different walls. I never really had a hallway, so I was excited about having a "gallery wall." They sat there for a few weeks awaiting the return of my husband and I to have the same free time set aside to finish our project.
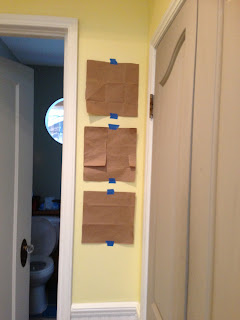
Now with Easter on the horizon and family scheduled for brunch, I decided to tackle the project myself, wary of the fact that my husband doesn't want too many holes in our freshly painted/spackled walls and the fact that I don't use tape measure or do math in my head like a contractor, my talents lay elsewhere. I checked Pinterest of course to find out how to plan my project. I found this blog and started cutting out traced shapes of my frames from paper bags. This took way too long. I do not have a wall on a stairway like shown in the blog, and I did not finish, however, the planning would be good for organization on a bigger wall like in the blog.


Perry Mama

Now with Easter on the horizon and family scheduled for brunch, I decided to tackle the project myself, wary of the fact that my husband doesn't want too many holes in our freshly painted/spackled walls and the fact that I don't use tape measure or do math in my head like a contractor, my talents lay elsewhere. I checked Pinterest of course to find out how to plan my project. I found this blog and started cutting out traced shapes of my frames from paper bags. This took way too long. I do not have a wall on a stairway like shown in the blog, and I did not finish, however, the planning would be good for organization on a bigger wall like in the blog.

The best tip I found, was using toothpaste on the back of the frame to mark your hanging hardware. Hold it up to the wall, and it leaves a mark where to put your nail. Genius and so simple, definitely more my style than the thorough planning of a huge wall. And, I could match up the frames so easily!
Here are the tools I used, and my two year old followed me around with the box of nails and handed me one as I needed them. He loved to shake them and was pretty good at keeping them all together. More importantly, he cheered me on, and felt included and proud of the project. Ammonia free glass cleaner and newspaper to clean the frames since they were sitting on the floor collecting dust. I had black frames and used the sharpie black pen to fill in little dings in the wood.

Pardon the background, as you can see we have several more projects to do.
Here's my wall. I wanted them all touching and in a line, which I know isn't every one's style, but I like it, it's different and I have staggered my pictures on other walls.

Here's the original wall I showed you with the pictures hung:

Another tip I would recommend is inserting the nail at a 45 degree angle, if the picture didn't match exactly in my line up, I would just pound it in a little further.
I can't wait to put some brightly colored frames on the white wainscoting below and putting the kids artwork in it at their eye level down the hallway.
Here's another wall of pictures hung above a coat rack. I lined the one picture up with the edge of the rack because the wall is in between two doors. and one door opens against it.

Anyhow, happy home projects to you all, and until the next blog post. Thanks for reading!
Perry Mama


Comments
Post a Comment